Overwriting the default WebRequest used by WebClient

In Silverlight/WPF and WPF there’s today a WebClient class for making webrequests. Under the covers it creates HttpWebRequest for sending the request and HttpWebResponse for handling the response coming back from the server. In an older blogpost, I created a custom WebClient for WP7 that added support for GZIP compression this way.

However the default WebClient doesn’t actually create an “HttpWebRequest/Response” object, since this is an abstract class. What it really does is create internal subclasses that is then used. This is handled by the WebRequestCreator static class which really creates these classes for you. However a less-known feature is that you can actually tell your application that you want to use a specific client for handling the web request and responses for specific domains. You might actually already have fiddled with this in Silverlight if you wanted to explicitly let Silverlight handle the web requests instead of handing it off to the hosting browser control using the following statement:

WebRequest.RegisterPrefix("http://www.mydomain.com/", WebRequestCreator.ClientHttp);

This call makes all requests to www.mydomain.com go through the ClientHttp. As mentioned it’s possible to make your own requestor and completely intercept ANY requests made by WebClient!

If you have your own HttpWebRequest implementation ‘MyHttpWebRequest’, this would look something like this:

public static class MyWebRequestCreator
{
    private static IWebRequestCreate myCreator;

    public static IWebRequestCreate MyHttp
    {
        get
        {
            if (myCreator == null)
            {
                myCreator = new MyHttpRequestCreator();
            }
            return myCreator;
        }
    }

    private class MyHttpRequestCreator : IWebRequestCreate
    {
        public WebRequest Create(Uri uri)
        {
            return new MyHttpWebRequest(uri);
        }
    }
}

So now you can just call:

WebRequest.RegisterPrefix("http://", MyWebRequestCreator.MyHttp);
WebRequest.RegisterPrefix("https://", MyWebRequestCreator.MyHttp);

…and ALL web requests to http or https websites, will be routed through your MyHttpWebRequest class (which you granted still have to build). This class could just wrap the built-in ClientHttpWebRequest and you can modify/add/remove/decode stuff to your pleasing. This is awesome for test framework mock ups, but it’s also really neat for the GZIP WebClient control I mentioned earlier. Why? Well to use my GZipWebClient, you would have to go through all your code and change:

WebClient client = new WebClient();

to

WebClient client = new SharpGIS.WebClient();

This can be a lot of work, and even if you did that, what about all the 3rd party libraries you use, where you can’t go in and change that? Well enter RegisterPrefix! Do you want GZIP support in Hammock? Done! Do you want GZIP support in RestSharp? Done!* Do you want GZIP support in [insert favorite API here]? Done!

*Update: Actually this might not be the case. Some libraries uses some features that either is not possible to implement with the custom HttpWebRequest (like UserAgent), and I didn’t add support for Cookies as well. Both of these are for instance used by RestSharp.

So I went ahead and updated my Nuget Package for the GZipWebClient, so go grab v1.1, and you will only have to add 1-2 LINES OF CODE, and just execute it ONCE (for instance at startup), and EVERYTHING WebClient will be enhanced with GZIP compression. You can also grab the updated source on the original blogpost here.

I really have to give some credit to my co-worker Anargyros for this one, who mentioned that it might be possible to do it this way. Go follow him on twitter and give him some twitter love @tomahawk1187

Building A Multi-Touch Photo Viewer Control

If you want to view an image on your Windows Phone app, or on your Windows 8 tablet, most people would probably expect to be able to use their fingers to pinch zoom and drag using the touch screen.

Since this is a common scenario, I want to create a simple reusable control that allows me to do this using very little xaml, along the lines of this:

<my:ImageViewer
    Thumbnail="http://url.com/to/my/thumbnail.jpg"
    Image="http://url.com/to/my/MyImage.jpg"  />

…where Thumbnail is a low resolution image that loads fast, while the full resolution Image is being downloaded.

If you just want to use this control and don’t want to learn how to create a custom control, skip to the bottom to download the source for both Windows Phone and Windows 8 Runtime.

First off, we’ll create a new Windows Phone Class Library project and name it “SharpGIS.Controls”. (or whatever you like)
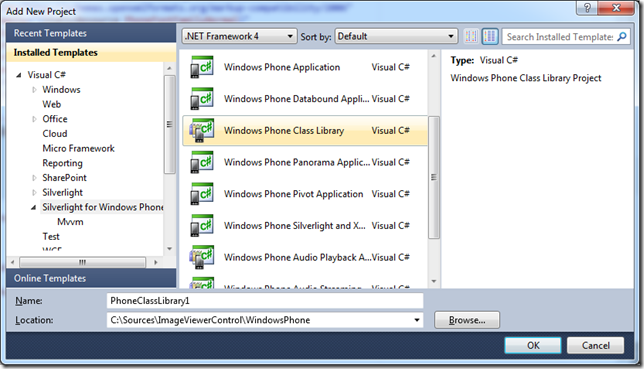
image

Create a new folder “Themes”, add a new XAML resource file and name it “Generic.xaml”. Make sure the “build action” for this file is set to “ApplicationDefinition”.

We will want to define the default template in this file for our control (if you are used to making User Controls, this is essentially where the XAML for custom controls go instead).

In the xaml we will want two things: An image for displaying a fast-loading thumbnail at first, and a second image for displaying the high resolution image. Also we will use a Grid around them to group them together. Generic.xaml should look something like this:

<ResourceDictionary
    xmlns="http://schemas.microsoft.com/winfx/2006/xaml/presentation" 
    xmlns:x="http://schemas.microsoft.com/winfx/2006/xaml"
    xmlns:local="clr-namespace:SharpGIS.Controls">
    <Style TargetType="local:ImageViewer">
        <Setter Property="Template">
            <Setter.Value>
                <ControlTemplate TargetType="local:ImageViewer">
                    <Grid x:Name="Root" Background="Transparent">
                        <Image x:Name="Thumbnail" Source="{TemplateBinding Thumbnail}" CacheMode="BitmapCache" />
                        <Image x:Name="Image" Source="{TemplateBinding Image}" CacheMode="BitmapCache" />
                    </Grid>
                </ControlTemplate>
            </Setter.Value>
        </Setter>
    </Style>
</ResourceDictionary>

Notice the “CacheMode” property. This is important to set, to get proper performance when zooming and panning the image. If you have a Windows Phone try the official Facebook app, open an image and you will see what I mean (if you worked on that app PLEASE fix this).

Next up is the actual code. Add a new class, and name it “ImageViewer”. Make it inherit from ‘Control’. Add a constructor and use the “DefaultStyleKey” to tell Silverlight that you have a template defined in Generic.xaml that it should use.

public class ImageViewer : Control
{
    public ImageViewer()
    {
        DefaultStyleKey = typeof(ImageViewer);
    }
}

Next we define the dependency properties for the two images that the template was binding to:

public ImageSource Image
{
    get { return (ImageSource)GetValue(ImageProperty); }
    set { SetValue(ImageProperty, value); }
}

public static readonly DependencyProperty ImageProperty =
    DependencyProperty.Register("Image", typeof(ImageSource), typeof(ImageViewer), null);

public ImageSource Thumbnail
{
    get { return (ImageSource)GetValue(ThumbnailProperty); }
    set { SetValue(ThumbnailProperty, value); }
}

public static readonly DependencyProperty ThumbnailProperty =
    DependencyProperty.Register("Thumbnail", typeof(ImageSource), typeof(ImageViewer), null);

We should now be able to use this control in a Windows Phone project. Add a new Windows Phone Appplication project to your solution, right-click the ‘references’ and select “add reference’. Pick the SharpGIS.Controls project.

You should now be able to use some XAML like this to display an image:

<my:ImageViewer
    xmlns:my="clr-namespace:SharpGIS.Controls;assembly=SharpGIS.Controls"
    Thumbnail="http://url.com/to/my/thumbnail.jpg"
    Image="http://url.com/to/my/image.jpg" />

That’s all fine, but you still can’t use any touch to zoom the image.

Go back to the code and override OnApplyTemplate(). This code executes when the template from Themes\Generic.xaml has been loaded, and it’s your chance to grab any reference to the elements in there and ‘do something’ with them. In user controls you would often set the event handlers directly in the xaml. With templates on custom controls, you will have to hook these up in code-behind during OnApplyTemplate().

Here we will hook up for the manipulation events, as well as assign a transform we will apply to the element when these events trigger.

private Grid Root;
        
public override void OnApplyTemplate()
{
    Root = GetTemplateChild("Root") as Grid;
    if (Root != null)
    {
        Root.ManipulationDelta += Root_ManipulationDelta;
        Root.ManipulationStarted += Root_ManipulationStarted;
        Root.RenderTransform = new CompositeTransform();
    }
    base.OnApplyTemplate();
}

The ManipulationDelta event triggers as you move. It will give you information about how much the user dragged, and how much he/she pinches, as well as the center of the pinch. Unfortunately the pinch scale amount is shown as separate X and Y directions, and no ‘Uniform Scale’ is shown. This makes it hard to get a good average of the scale, and you would have to pick just one of them (one could be pinching and the other stretching).

I’ve found that defining the amount you’re scaling is the change of the length of the diagonal of the boundingbox of all the touch points works well. Errrrrrr, that might have sounded confusing. Let’s use a picture instead. The orange circles below are touchpoints, and the rectangle is the box that encompasses all of them (2 or more points). The blue line is the diagonal length of this box. So the amount of scaling = length_Before / length_After.

image

We don’t get the actual touch points in the manipulation events. So instead I start with a simple box that I define as 1x1 and track the scaling of it. The diagonal length of that box at the beginning is the square root of 2, which we will define in the ManipulationStarted event. We also add a property for tracking the center of the box.

private Point? lastOrigin;
private double lastUniformScale;

private void Root_ManipulationStarted(object sender, ManipulationStartedEventArgs e)
{
    lastUniformScale = Math.Sqrt(2);
    lastOrigin = null;
}

So all that’s left is listen to the ManipulationDelta event, and update the transform on the grid. This consist of comparing previous origin to the new, as well as calculating the scale factor based on the box diagonal. Also note that when you apply scale, this is means you’re scaling out and away from the upper left corner. To offset this, you will need to add some additional translation to the image, as shown below:

private void Root_ManipulationDelta(object sender, ManipulationDeltaEventArgs e)
{
    var transform = Root.RenderTransform as CompositeTransform;
    if (transform != null)
    {
        var origin = e.ManipulationContainer.TransformToVisual(this).Transform(e.ManipulationOrigin);

        if (!lastOrigin.HasValue)
            lastOrigin = origin;

        //Calculate uniform scale factor
        double uniformScale = Math.Sqrt(Math.Pow(e.CumulativeManipulation.Scale.X, 2) + 
                                        Math.Pow(e.CumulativeManipulation.Scale.Y, 2));
        if (uniformScale == 0)
            uniformScale = lastUniformScale;

        //Current scale factor
        double scale = uniformScale / lastUniformScale;

        if (scale > 0 && scale != 1)
        {
            //Apply scaling
            transform.ScaleY = transform.ScaleX *= scale;
            //Update the offset caused by this scaling
            var ul = Root.TransformToVisual(this).Transform(new Point());
            transform.TranslateX = origin.X - (origin.X - ul.X) * scale;
            transform.TranslateY = origin.Y - (origin.Y - ul.Y) * scale;
        }
        //Apply translate caused by drag
        transform.TranslateX += (origin.X - lastOrigin.Value.X);
        transform.TranslateY += (origin.Y - lastOrigin.Value.Y);

        //Cache values for next time
        lastOrigin = origin;
        lastUniformScale = uniformScale;
    }
}

And that’s it!

Now what’s left is to turn off the thumbnail when the image has loaded, as well as raise loaded events for the high resolution image, so that you can display a progress bar while you wait for the image to load. I won’t go into details on this, but in OnApplyTemplate, simply grab the Image template child, and listen for the ImageLoaded event.

I’ve packaged it all up in one complete control, as well as a sample showing how this would be used in an application where you would navigate to a page with this control on it.

You can download the source and a sample app here.

Here’s a preview off what that app looks like:

Reading and Writing text files in Windows 8 Metro

Perhaps I’m missing something here, but writing a simple text file and reading it back in is surprisingly complex in Windows 8 Metro style apps/WinRT. In .NET there’s a one-liner for such a trivial task, but I haven’t been able to find anything like that in WinRT. So to save you the trouble, here’s my utility methods for this:

Reading a file from the ApplicationData LocalFolder\DataCache:

public static async Task<string> ReadFile(string filename)
{
    var localFolder = Windows.Storage.ApplicationData.Current.LocalFolder;
    var folder = await localFolder.GetFolderAsync("DataCache");
    var file = await folder.GetFileAsync(filename);
    var fs = await file.OpenAsync(Windows.Storage.FileAccessMode.Read);
    var inStream = fs.GetInputStreamAt(0);
    Windows.Storage.Streams.DataReader reader = new Windows.Storage.Streams.DataReader(inStream);
    await reader.LoadAsync((uint)fs.Size);
    string data = reader.ReadString((uint)fs.Size);
    reader.DetachStream();
    return data;
}

Writing to a file in the ApplicationData LocalFolder\DataCache:

public static async void WriteFile(string filename, string contents)
{
    var localFolder = Windows.Storage.ApplicationData.Current.LocalFolder;
    var folder = await localFolder.CreateFolderAsync("DataCache", Windows.Storage.CreationCollisionOption.OpenIfExists);
    var file = await folder.CreateFileAsync(filename, Windows.Storage.CreationCollisionOption.ReplaceExisting);
    var fs = await file.OpenAsync(Windows.Storage.FileAccessMode.ReadWrite);
    var outStream = fs.GetOutputStreamAt(0);
    var dataWriter = new Windows.Storage.Streams.DataWriter(outStream);
    dataWriter.WriteString(contents);
    await dataWriter.StoreAsync();
    dataWriter.DetachStream();
    await outStream.FlushAsync();
}

I used this to create a little data cacher , as shown below (Note: you could use the LocalSettings for this, but there’s a very low limit to how large objects stored there can be):

public static void SaveData(string filename, object objectGraph, bool overwriteIfNull = true)
{
    string json = null;
    if(objectGraph != null)
        json = SerializeObjectGraph(objectGraph);
    if (json != null || overwriteIfNull)
    {
        WriteFile(filename, json);
    }
}

private static string SerializeObjectGraph(object graph)
{
    if (graph == null) return null;
    DataContractJsonSerializer ser = new DataContractJsonSerializer(graph.GetType());
    MemoryStream ms = new MemoryStream();
    ser.WriteObject(ms, graph);
    var bytes = ms.ToArray();
    return UTF8Encoding.UTF8.GetString(bytes, 0, bytes.Length);
}

public static async Task<T> LoadData<T>(string filename)
{
    var json = await ReadFile(filename);
    MemoryStream ms = new MemoryStream(UTF8Encoding.UTF8.GetBytes(json));
    DataContractJsonSerializer ser = new DataContractJsonSerializer(typeof(T));
    T result = (T)ser.ReadObject(ms);
    return result;
}

If there’s an easier way to do this, please do let me know. If not, hopefully we’ll get some more utility/helper methods as the SDK matures.

UPDATE: Turns out that there is an easier way to do this after all using the Windows.Storage.PathIO class!

Reading a text file in one line of code using WinRT:

string contents = await Windows.Storage.PathIO.ReadTextAsync("ms-appdata:///local/DataCache/test.txt");

Opening a managed stream using a path:

using (var stream = await Windows.Storage.ApplicationData.Current.LocalFolder.OpenStreamForReadAsync("DataCache\\test.txt"))
    using (var streamReader = new StreamReader(stream))
        contents = streamReader.ReadToEnd();

Similarly Windows.Storage.PathIO also have other neat one-liners. Check out the reference here: http://msdn.microsoft.com/en-us/library/windows/apps/windows.storage.pathio.aspx

Notice that there is also a WriteTextAsync(string,string) method. However this seems to throw an exception if the file doesn’t already exist, so I’m not sure how useful that is at this point, considering this will be a-chicken-and-the-egg scenario. So for now, the code above is still useful for writing files, and of course also for understanding the more low-level file operations.