Creating your very first holographic app in Unity

Most of the tutorials at the Holographic Academy starts out with a starter-project with a bunch of stuff already set up for you. If you’re new to Unity and/or holographic development, I found that a little bit “cheating” and wanted to know how to do things “from scratch”, to property understand it. I thought I would share my findings in a set of blogposts – they wiill serve as notes for myself, but figured it might be useful for others as well. If something is wrong or you know a better way, please comment in the comment section.

I have all the steps recording in a video at the bottom, but for those who like to read and understand the steps, I’ll go with that first. So lets get started.

First launch Unity and create a new project. Name it whatever you’d like.

After launch, you’ll see in the Hierarchy view a “Main Camera” and a “Directional Light” object.

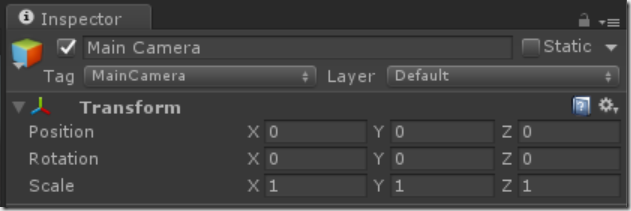
First we’ll configure the camera for Unity. Keep the name “Main Camera”. From my understanding this is what automatically becomes the camera controlled by your HoloLens. But we have to configure it to be placed at the center of the world.

Select the camera in the hierarchy and In the inspector set the position and rotation to all zeros:
image

Next we need to set the camera to render “nothing” as black. By default it renders blue skies, but since “black” renders as transparent and we want to see the real world around our holograms, we set “Clear Flags” to “Solid Color” and “Background” to “Black”:

image

It is also recommended to set the Near Clipping Plane to 0.85 m. This prevents users from getting “too close” to holograms and get all cross eyed from it. It can be very uncomfortable for people, but feel free to set it to 0.1, to get really up close to your holograms.


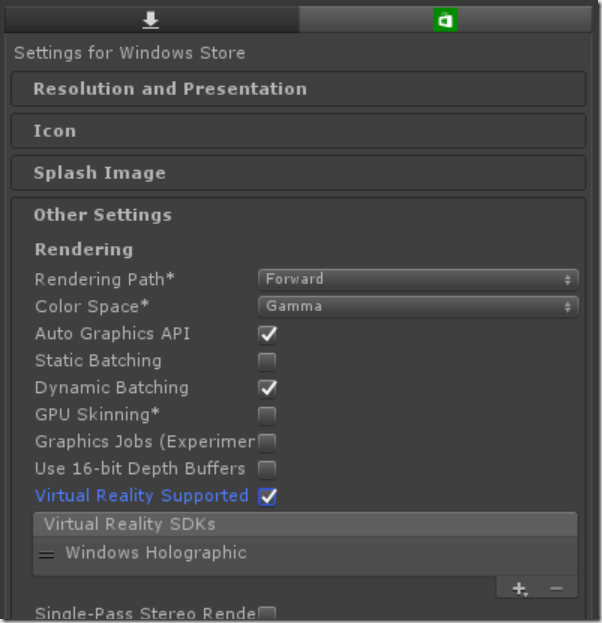
Next we need to configure the app for Virtual Reality. Go to Edit –> Project Settings –> Player. Click the green “Store Logo” tag, expand “Options” and check off “Virtual Reality Supported”. You should then see “Windows Holographic” listed under the “Virtual Reality SDKs” list.
image

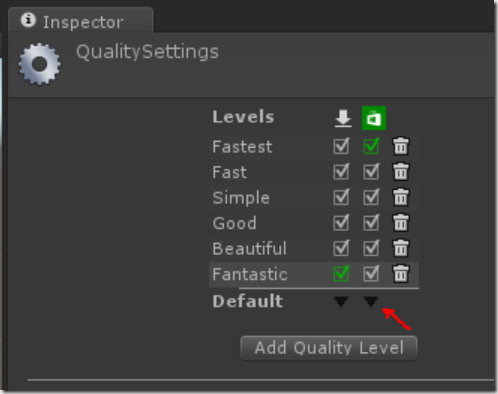
Lastly, we configure the app to run with the fastest rendering possible. To go Edit –> Project Settings –> Quality. Under the green “Store Logo” tag to the left of “Default” click the little black dropdown triangle (highlighted with the red arrow blow) and select “Fastest”. You should see “Fastest” now be green in the first line under the store logo.
image


Now at this point we’ve done all the steps for configuring your Holographic app. To recap:

  1. Place camera at 0,0,0, name it “Main Camera” and set the background to solid color black.
  2. Enable the app for Virtual Realtiy
  3. Set quality settings to “Fastest”

At this point we can save the app, and build a Windows Store Visual Studio project to deploy to the HoloLens, but since we haven’t added anything to the scene, it would be a boring app, so let’s do that first before creating the visual studio project.

Right-click inside the Hierarchy Panel, and select “Create Empty”. You should see a “GameObject” be created. Right-click it at click “Rename”, and name it something like “HologramCollection”. Double-check the transform settings and sure position is placed at 0,0,0.

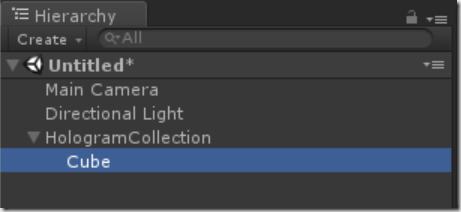
Next select the HologramCollection object, and right-click it. Select “3D Object –. Cube”. A new cube should be created under the collection, and the Hierarchy panel should look like this:
image

Select the Cube, and in the position, set it to 0, –0.5, 2. This means “place it 0.5 meters below the camera, and two meters in front. When the app starts, this is where the hologram will be placed relative to the HoloLens. The cube is 1x1x1 meter. That’s a little bit large for a Hologram, so set the scale to 0.25 for all 3 values, to make it .25m on each side.
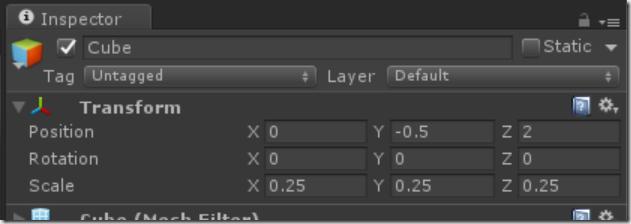
image

That’s it for setting up our scene. Next lets create and build it. First go to “File –> Save Scene as…” and give it a name like “Main Scene”.

Next go to “File –> Build settings…”. For platform select “Windows Store”. SDK to “Windows 10”, UWP Build Type to “D3D” and click “Build”.

Lastly click “Add open scenes” and ensure the scene you just saved got added to the list at the top.
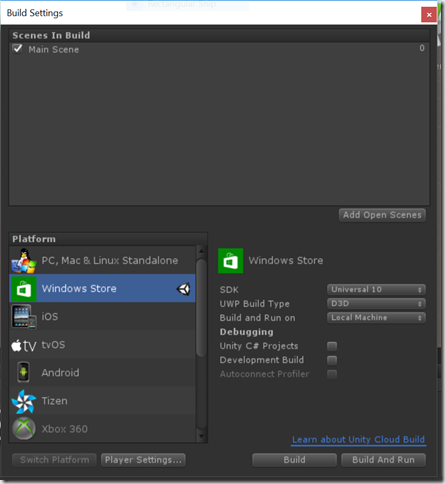
image

You’ll be asked for a folder to create it in. Create a folder in your project called “App”, and select the folder. The the project is done being created (it takes a while the first time), go into the app folder and open the Visual Studio solution.

Next, set the build architecture to x86, and select either the holographic emulator, or if you have a device select the “Remote Machine” and enter the IP (Tip: From within the hololens open the start menu and ask Cortana “What is my IP”), or plug the device in with USB and select “Device”.

Hiit F5 and start your first holographic app!

All the steps are also shown in the video below. At the end of the video you’ll see the app running inside the HoloLens.


Enjoy!

The beginnings of an AllJoyn based Home Automation Controller

I’ve been working on building my own home automation controller to make my home smarter. I decided to build this around AllJoyn so I can avoid getting any type of device-protocol lock-in, but can abstract everything with AllJoyn.

I’m currently at a stage where I have several, lights, switches, temperature, humidity and door/window sensors, as well as a way to directly read my house’s SmartMeter to get real-time power consumption, all exposed via AllJoyn.

Since I want to build a controller; that can pick up any AllJoyn device at runtime, without the need to have a preconfigured list of supported device types, I needed a way to discover any device without any prior knowledge. Luckily there’s a great library with full source from Microsoft that does just this, and I wrapped it all up into a little NuGet package, and wrote an article on how to use it on Hackster here: https://www.hackster.io/dotMorten/discovering-and-interacting-with-any-alljoyn-device-0dbd86


I’m excited to be going to CES2016 for a few days this week, and will be meeting with the AllSeen Alliance who has a big presence there, and get some inspiration and hopefully get some questions answered, before moving forward with my controller.

Here’s a few photos of it all running on a Raspberry PI with a little 5” display.

WP_20151026_11_34_30_Pro

Home screen


WP_20151222_12_58_27_Rich_LI

Tracking power consumption over time.


image

Automation Rule Designer


Just some of the AllJoyn devices in my house…

First release of WindowsStateTriggers

With the release of the Windows 10 Universal SDK today I’ve updated the Github Repository for the WindowsStateTriggers for the final SDK. Go grab the source code today!

During the beta period I’ve received several great fixes and additions from the community. Thank you all who contributed!

The Nuget package is available here: https://www.nuget.org/packages/WindowsStateTriggers

Get full source here: https://github.com/dotMorten/WindowsStateTriggers


See the WIKI or Test App for usage some usage examples.

Create a Universal 3D App in a matter of minutes

We just released version 10.2.6 of 'ArcGIS Runtime for .NET SDK', which now supports 3D and KML files on both Windows Store 8.1, Windows Phone 8.1 and WPF. This means you can now quickly build 3D applications that supports all these platforms. We also released the package on NuGet for your convenience.

As a demonstration how quick it is to create a Windows Phone and Windows Store 3D app, here's a little video creating a universal 3D app from scratch in a couple of minutes:

Displaying a backbutton on your app title bar

Disclaimer: This article is written based on Windows 10 Tech Preview – Build 10122. Things might change completely in the future.

Some of the Windows 10 apps have a back button at the top of the app bar. Here’s an example in the Settings Control Panel:

image

We can add this to our own apps but using the SystemNavigationManager’s AppViewBackButtonVisibility.

Here’s how that will look like:

SystemNavigationManager.GetForCurrentView().AppViewBackButtonVisibility = AppViewBackButtonVisibility.Visible;

When you run this code you’ll now also see the exact same back button in your Windows UWP Desktop app! No need to waste precious screen real-estate when there’s room on the top bar.

Of course for Windows Phone this isn’t really needed (although nothing seems to happen if you call this API), call it anyway, just in case you're running on a device that can show the backbutton - it seems like it just doesn't show on devices with hardware:


   //Show UI back button - do it on each page navigation
   if (Frame.CanGoBack)
      SystemNavigationManager.GetForCurrentView().AppViewBackButtonVisibility = AppViewBackButtonVisibility.Visible;
   else
      SystemNavigationManager.GetForCurrentView().AppViewBackButtonVisibility = AppViewBackButtonVisibility.Collapsed;


   //Hook up back buttons - Do this just once - ie on app launched
   SystemNavigationManager.GetForCurrentView().BackRequested += (s, e) =>
   {
       if (Frame.CanGoBack)
           Frame.GoBack();
   };
   if (Windows.Foundation.Metadata.ApiInformation.IsTypePresent("Windows.Phone.UI.Input.HardwareButtons"))
   {
       //Also use hardware back button
       Windows.Phone.UI.Input.HardwareButtons.BackPressed += (s, e) =>
       {
           if (Frame.CanGoBack)
           {
               e.Handled = true;
               Frame.GoBack();
           }
       };
   }

Now you get back button support in both desktop and phone apps when you can navigate back!

Unfortunately the BackRequested and BackPressed event arguments are different, so you can’t reuse the same event handler for both. That’s quite a shame – I hope Microsoft will be cleaning that up soon.

Creating DeviceFamily specific layouts in a Universal App

Disclaimer: This article is written based on Windows 10 Tech Preview – Build 10041. Things might change completely in the future.

In an earlier post, I showed how to use a StateTrigger to adapt parts of your UI to a specific device family (Device families are: Windows Desktop, Windows Mobile, XBox, IoT etc).

However if you want to do major differences in your UI, that’s probably not the most efficient way. Windows 10 comes with a nice trick to use completely different XAML files based on the device family you’re running on.

Let’s first create a new blank UAP project, and add the following XAML to the main <Grid> on MainPage.xaml

<Grid Background="{ThemeResource ApplicationPageBackgroundThemeBrush}">
 
    <TextBlock Text="Hello Windows Desktop"
                HorizontalAlignment="Center"
                VerticalAlignment="Center"
                />        
 
</Grid>


When you run this on Desktop,you not surprisingly get this:

image

And also not surprising you get this on Windows Phone:

image

Now what we want to do is override the MainPage.xaml for Windows Phone and display a more correct message.

First create a new folder called DeviceFamily-[family] where [family] is ‘Mobile’:

image

Right-click this folder and choose “Add new item”

image

Pick “Xaml View” and change the name to “MainPage.xaml” This page is similar to a blank page; but is for overriding specific XAML pages – ie it doesn’t include the code behind, which you already have.

Now add the new TextBlock to this page with a more device family specific message:

<Grid Background="{ThemeResource ApplicationPageBackgroundThemeBrush}">
 
    <TextBlock Text="Hello Windows Phone" 
                HorizontalAlignment="Center"
                VerticalAlignment="Center" />
        
</Grid>

Because this XAML file ii in the DeviceFamily-Mobile, when running on Windows mobile, this XAML will be used instead of the default MainPage.xaml defined in the root of the project

image

So this method enables you to completely override the UI and adapt for the device family and maintain the same code-behind.

Using Windows 10’s Extended Execution

Disclaimer: This article is written based on Windows 10 Tech Preview – Build 10041. Things might change completely in the future.

On Windows Phone Silverlight 8.0 it was possible to continue run an while the app wasn’t foregrounded. This was useful for Turn-by-turn or run-tracker type of apps. So even if you got a phone call or turned the screen off, the app would continue to run. Unfortunately that functionality was removed (well not removed, but rejected in certification) from Windows Phone Silverlight 8.1, and it was never added to Windows Runtime apps. That meant you were pretty much stuck on Silverlight 8.0 if you were building any of these apps.

However, in Windows 10 the functionality is finally here with the Windows Runtime! There’s not a lot of doc on it, and especially on phone it seems rather buggy, but I’ll try and explain the gist of it here.

First let’s create a new app, and add some basic location tracking to it.

private Geolocator locator;
private ObservableCollection<string> coordinates = new ObservableCollection<string>();
public MainPage()
{
    this.InitializeComponent();
    locator = new Geolocator();
    locator.DesiredAccuracy = PositionAccuracy.High;
    locator.DesiredAccuracyInMeters = 0;
    locator.MovementThreshold = 0;
    locator.PositionChanged += Locator_PositionChanged;
    coords.ItemsSource = coordinates;
}
 
private void Locator_PositionChanged(Geolocator sender, PositionChangedEventArgs args)
{
    var coord = args.Position;
    string position = string.Format("{0},{1}",
        args.Position.Coordinate.Point.Position.Latitude, //yeah it's this deep! Surprised smile
        args.Position.Coordinate.Point.Position.Longitude);
    var _ = Dispatcher.RunAsync(CoreDispatcherPriority.Normal, () =>
    {
        coordinates.Insert(0, position);
    });
}

And add the following ListView to the main page:

<ListView x:Name="coords" />

When you run this app, you’ll start seeing coordinates getting added to the list about once every second.

Now if you were to minimize the app (if you run as a desktop app – not a phone app), and return to the app, you might notice that the app still got coordinates added while it was minimized. That’s probably because you had the debugger attached. Try running the app without Visual Studio debugging, and you’ll notice the app will completely pause when it’s minimized. That means the app will stop tracking you if it’s not active. So first lesson: The Visual Studio debugger lies to you and prevents the app from suspending.

If we want to continue running the app while another app is active (or on a phone get an unexpected phone call), we now have a new “Extended Execution” session that we can start.

private ExtendedExecutionSession session;
 
private async void StartLocationExtensionSession()
{
   session = new ExtendedExecutionSession();
   session.Description = "Location Tracker";
   session.Reason = ExtendedExecutionReason.LocationTracking;
   session.Revoked += ExtendedExecutionSession_Revoked;
   var result = await session.RequestExtensionAsync();
   if (result == ExtendedExecutionResult.Denied)
   {
       //TODO: handle denied
   }
}

This tells the app that we’d like to continue even if the app is backgrounded. So you would usually call this API when you start running or doing your route.

Similarly we can stop the execution by disposing the session:

if (session != null)
{
    session.Dispose();
    session = null;
}

You would typically call this at the end of the run or when you reach your destination.

The only piece we’re missing is the Revoked event – I’m not entirely sure when this fires (there’s no documentation available yet), but on the Windows Phone emulator it fires the moment you leave the app, so I haven’t been able to get this working there.

private void ExtendedExecutionSession_Revoked(ExtendedExecutionSession sender, ExtensionRevokedEventArgs args)
{
    //TODO: clean up session data
    StopLocationExtensionSession();
}

Now add this to your app and call the StartLocationExtensionSession method and minimize your app. Wait a little and come back to it – note that points have been collected while the app wasn’t active. So now you can go write your run tracker app for Windows Desktop and take your desktop computer for a run… or wait for a Windows Phone 10 build where it’s working Smile

Using Custom Visual State Triggers

Disclaimer: This article is written based on Windows 10 Tech Preview – Build 10041. Things might change completely in the future.

The Windows 10 Preview SDK was finally released, and we all finally get a peek at what the new Universal App Projects (UAP) are all about. It’s one binary that will run everywhere. This means that it’s also one XAML to run both on Windows and Windows Phone. But because the user experience is usually quite different you might want a different UI for it. So a new functionality was added to Visual State that allows you to easily change the layout based on the width of your window. So the idea is that the layout adapts not based on device, but by screen real-estate. Here’s what that could look like:

<Grid >
  <VisualStateManager.VisualStateGroups>
    <VisualStateGroup >
      <VisualState x:Name="narrow">
        <VisualState.StateTriggers>
          <AdaptiveTrigger MinWindowWidth="0" />
        </VisualState.StateTriggers>
        <VisualState.Setters>
          <Setter Target="status.Text" Value="Narrow view" />
        </VisualState.Setters>
      </VisualState>
      <VisualState x:Name="wide">
        <VisualState.StateTriggers>
          <AdaptiveTrigger MinWindowWidth="600" />
        </VisualState.StateTriggers>
        <VisualState.Setters>
          <Setter Target="status.Text" Value="Wide view" />
        </VisualState.Setters>
      </VisualState>
    </VisualStateGroup>
  </VisualStateManager.VisualStateGroups>
  
  <TextBlock x:Name="status" FontSize="40"
  HorizontalAlignment="Center" VerticalAlignment="Center" />
</Grid>
WideNarrowState

So the basic idea is that by using the AdaptiveTrigger, when the window gets small enough, switch to the phone/narrow UI. So on a phone it’ll probably always be this UI used. Pretty neat, and allows for a similar experience across devices, but adapt for bigger screens.

When taking a closer look at the StateTriggers property, it takes a collection of ‘StateTrigger’, which is an abstract class that AdaptiveTrigger inherits from. So it stands to reason that perhaps we can create our own state triggers?

Supposed basing your UI on the width isn’t good enough, and you want to base it on the platform you’re on (Windows vs Windows Phone), we can create a new state trigger for this purpose. All we have to do is call the base method SetTriggerValue(bool) whether the conditions of the state is enabled or not. So here’s what a class like that would look like:

public class DeviceTypeAdaptiveTrigger : StateTriggerBase
{
    public DeviceType PlatformType
    {
        get { return (DeviceTypeAdaptiveTrigger.DeviceType)GetValue(DeviceTypeProperty); }
        set { SetValue(DeviceTypeProperty, value); }
    }
 
    public static readonly DependencyProperty DeviceTypeProperty =
        DependencyProperty.Register("DeviceType", typeof(DeviceType), typeof(DeviceTypeAdaptiveTrigger),
        new PropertyMetadata(DeviceType.Unknown, OnDeviceTypePropertyChanged));
 
    private static void OnDeviceTypePropertyChanged(DependencyObject d, DependencyPropertyChangedEventArgs e)
    {
        var obj = (DeviceTypeAdaptiveTrigger)d;
        var val = (DeviceType)e.NewValue;
        var qualifiers = Windows.ApplicationModel.Resources.Core.ResourceContext.GetForCurrentView().QualifierValues;
        if (qualifiers.ContainsKey("DeviceFamily") && qualifiers["DeviceFamily"] == "Mobile")
            obj.SetTriggerValue(val == DeviceType.Mobile);
        if (qualifiers.ContainsKey("DeviceFamily") && qualifiers["DeviceFamily"] == "Desktop")
            obj.SetTriggerValue(val == DeviceType.Desktop);
    }
 
    public enum DeviceType
    {
        Unknown = 0, Desktop = 1, Mobile = 2,
    }
}

And we can use this in XAML this way:

<VisualStateGroup>
    <VisualState x:Name="windows">
        <VisualState.StateTriggers>
            <triggers:DeviceTypeAdaptiveTrigger DeviceType="Desktop" />
        </VisualState.StateTriggers>
        <VisualState.Setters>
            <Setter Target="greeting.Text" Value="Hello Windows!" />
        </VisualState.Setters>
    </VisualState>
    <VisualState x:Name="phone">
        <VisualState.StateTriggers>
            <triggers:DeviceTypeAdaptiveTrigger DeviceType="Mobile" />
        </VisualState.StateTriggers>
        <VisualState.Setters>
            <Setter Target="greeting.Text" Value="Hello Phone!" />
        </VisualState.Setters>
    </VisualState>
</VisualStateGroup>

image

I’ve created a few more triggers and put them on Github. I won’t go into the code here, but you can grab the source up there. But instead here’s how we can use some of these:

OrientationStateTrigger: Adapt the UI based on the screen orientation: Portrait or Landscape

<VisualStateGroup>
    <VisualState x:Name="landscape">
        <VisualState.StateTriggers>
            <triggers:OrientationStateTrigger Orientation="Landscape" />
        </VisualState.StateTriggers>
        <VisualState.Setters>
            <Setter Target="orientationText.Text" Value="Landscape!" />
        </VisualState.Setters>
    </VisualState>
    <VisualState x:Name="portrait">
        <VisualState.StateTriggers>
            <triggers:OrientationStateTrigger Orientation="Portrait" />
        </VisualState.StateTriggers>
        <VisualState.Setters>
            <Setter Target="orientationText.Text" Value="Portrait!" />
        </VisualState.Setters>
    </VisualState>
</VisualStateGroup>

IsTypePresentStateTrigger: Enabled/disable UI based on whether a certain API is available. For instance if a hardware back button is present (usually Windows Phone), we can hide the back button from the UI, and free up some screen space.

<VisualState x:Name="backButton">
    <VisualState.StateTriggers>
        <triggers:IsTypePresentStateTrigger TypeName="Windows.Phone.UI.Input.HardwareButtons" />
    </VisualState.StateTriggers>
    <VisualState.Setters>
        <Setter Target="BackButton.Visibility" Value="Collapsed" />
    </VisualState.Setters>
</VisualState>

Now the next question is: Does these values support binding? If they do, these triggers could be the new equivalent of WPF’s DataTriggers. So let’s create a simple data trigger that turns something on, based on a boolean. We can implement a simple IsTrueStateTrigger / IsFalseStateTrigger and just call the base method if the value we bound is true or not.

<VisualState>
    <VisualState.StateTriggers>
        <triggers:IsTrueStateTrigger Value="{Binding MyBoolean}" />
    </VisualState.StateTriggers>
    <VisualState.Setters>
        <Setter Target="box.Visibility" Value="Collapsed" />
    </VisualState.Setters>
</VisualState>

Of course I could use a value converter for this as well, but this has a lot greater flexibility – a converter would have to be written to convert to Visible/Collapsed state, whereas this trigger can set any property to any value type.

Got any more ideas for useful generic state triggers? Fork and make a pull request!

https://github.com/dotMorten/WindowsStateTriggers

Big props goes to Scott Lovegrove for directing my attention to the possibility of custom state triggers

Running a .NET app on Galileo using Mono

In my first blog post on my home automation project, I mentioned that the ultimate goal was to run it all on a Galileo, but since .NET isn’t really supported yet, this wasn’t an option. Too the rescue comes Jer with his Mono port, allowing you to run .NET console apps on the Galileo. You can read the details on this on his blog post here: http://jeremiahmorrill.wordpress.com/2014/08/31/mono-on-windows-iot-galileo/

In my second blog post, I wrote a little console app that acts as a small webserver that allows Windows Store and Windows Phone apps to register themselves as a push target, and the console app can send push messages to these apps. In this blog post we’ll use Jer’s mono hack to get this running on the Galileo.

First, we need to “install” mono on Galileo. Jump to Jer’s blog post and grab the mono_iot.zip file at the bottom of his blog post. Next unzip this file to the Galileo in a root folder like \mono\. You can access the Galileo in a network path by adding \c$\ to the network path. Ie. unzip into: \\mygalileo\c$\mono\ (if your device name is ‘mygalileo’ or replace it with the name or IP number). If you haven’t done this before, you’ll be prompted for username/password. Enter “mygalileo\Administrator” and your admin password. That’s really all that’s required for ‘installing’ mono.

Now to run a .NET app, all you have to do is call [path-to-mono.exe] [path-to-my-app.exe] to launch the app with the mono runtime. Almost any .NET console app will work. Ie:

c:\mono\bin\mono.exe c:\sampleapp\ConsoleApp1.exe

Next, we’ll run the push service app from my previous blog post. Compile the PushService app (yes you can use Visual Studio – no need for the Mono compiler) and copy it to the Galileo. Then open a Telnet terminal to Galileo, and start the service:

c:\mono\bin\mono.exe c:\PushService\PushService.exe

Next, update the client store/phone app to point to the IP of your galileo device, and make sure it’s on the same network. When running the app, you should now be able to register with the push service.

image

CTRL-Q to quit doesn’t seem to work. I’m guessing the CTRL key isn’t sent via telnet. You can just hit CTRL-C to quit the app.

Also if you press “S” to push a message, you’ll notice that the app fails. This is because the push notification hits an SSL secured server, and Mono doesn’t come with any SSL roots certificates installed. An in-depth article is describing this here: http://www.mono-project.com/docs/faq/security/ and here: http://www.mono-project.com/archived/usingtrustedrootsrespectfully/ . Note though that the current Mono build you installed doesn’t seem to work for the certificate imports, so most of the solutions might not work for you. As a TEMPORARY alternative, we can get rid of the SSL certificate validation. Note: This is quite dangerous and should NOT be used in production. But for testing this is fine (if you think this is not a big deal, think again – iOS and MacOS had this issue recently and it was a MAJOR security problem). To disable validation, we basically just take over validation and return ‘true’ to say the certificate is fine regardless of it’s contents. You could also enhance this yourself by performing your own validation. To do this, all we need to add is the following line of code when the console app starts up:

ServicePointManager.ServerCertificateValidationCallback = delegate { return true; };

Now redeploy the app, and you can now get your Galileo to perform push messages straight to your phone or tablet! How cool is that???

image

This is all the starting pieces you need to build a small simple .NET based webserver for controlling your Galileo. At the same time it’s all you need for getting your Galileo to notify you of certain events occurring. Bottom line: It’s the first big step into a .NET based home automation controller. The next big step is to create the building blocks for a trigger –> event system, so we can start automating and monitoring our home with the power of .NET and Windows on Devices.